Email: [email protected]
Whatsapp number: 1 (580) 590-0258
Pre-Purchase Hardware Checklist & Setup Guide
The Tapper Engine is a high-performance hybrid hardware/software utility. To ensure low-latency performance across different Windows systems, we run our control software as raw Python files directly on your computer.
Before purchasing the physical hardware kit, you must verify that your system is fully compatible. If you cannot complete the pre-purchase checklist below, do not buy the hardware kit.
1. Pre-Purchase Hardware Checklist
Confirm you have the following resources before placing an order:
- Operating System: A clean, updated installation of Windows 10 or 11.
- Two Available USB Ports: Your computer must have two functioning USB ports available simultaneously.
- Two USB Cables: You need one high-quality USB-C (or micro-USB) cable for screen-mirroring your phone, and one cable for the Arduino Nano.
- Android Phone: Your phone must be an Android device.
- System settings: You must enable Developer Options and turn on USB Debugging.
- Device status: Depending on your phone model and security patch level, some configurations may require standard root access to allow smooth, unrestricted screen mirroring, though the physical touch itself is handled strictly by our external hardware.
2. The Pre-Purchase “Litmus Test”
To protect the software while allowing you to verify compatibility, we distribute our screen-mirroring script for free. Do not buy the hardware kit until you complete this test:
- Download our free starter folder from our Google Drive link: [INSERT YOUR GOOGLE DRIVE LINK HERE].
- Inside, you will find a single file: run_scrcpy.bat.
- Connect your Android phone to your PC via USB with USB Debugging enabled.
- Double-click run_scrcpy.bat.
- If a low-resolution, high-framerate window displaying your phone’s screen pops out successfully, your computer vision pipeline is compatible. If the window fails to open or cannot connect, do not purchase the kit.
3. The Software Toolchain (What You Must Install)
Once you purchase the hardware, you will receive the rest of the software files. To run them, you must install these developer tools on your Windows PC:
A. Python Installation
- Download and install Python 3.10 (or newer).
- Critical Step: During the installation wizard, you must check the box that says “Add Python to PATH” before clicking install.
B. Sublime Text Installation
- Download and install Sublime Text (a lightweight text and code editor). We use this to launch the bot.
C. Install Python Packages (Command Prompt)
Open your Windows Command Prompt (search for cmd in your start menu) and run the following command to install the required libraries:
code Bash
pip install numpy dxcam pyserial pynputD. Install Scrcpy
Go to https://github.com/genymobile/scrcpy and install scrcpy. Move the folder to the C: location.
Copy this text into Sublime Text, and save it as run_scrcpy.bat
@echo off
:: Change directory to where scrcpy is installed if this script is run from elsewhere
cd /d "C:\scrcpy-win64-v4.0"

scrcpy ^
  --max-size=128 ^
  --video-bit-rate=1M ^
  --max-fps=60 ^
  --no-audio ^
  --video-buffer=0 ^
  --no-control

pause
If you run the bat file, you should get a very low resolution mirroring of your Android screen.
4. Understanding the 3 Core System Files
When you purchase the kit, you will get access to these three files. Here is what they are and how they work:
- run_scrcpy.bat: A batch file that launches screen mirroring at an optimized, ultra-low resolution and high framerate to minimize display-mirroring lag.
- setup_phone.py: The calibration script. You will run this first to click on target pixels on your mirrored screen and save their locations.
- phone_config.json: The settings file generated by the calibrator. It holds your exact screen coordinates and RGB colors.
- bot.py: The main automation engine with the graphical user interface (GUI).
- arduino_tapper.ino (Optional): The C++ source code for the Arduino Nano. Your Arduino comes pre-loaded with this code, so you do not need to upload it unless you want to modify the hardware logic.
5. Live Desktop Setup Rules
When running the bot, your desktop environment must be strictly organized to ensure the computer vision can read the pixels correctly:
- Maximize the Screen: Always maximize the scrcpy window to your monitor’s full resolution. This “normalizes” the coordinates so the bot knows exactly where to look.
- The Left-Side Rule: Keep the Python/Sublime Text window on the left side of your screen, and keep your maximized scrcpy window on the right/center. The control GUI must never overlap or cover up the mirrored phone screen, as the code reads those pixels directly from the GPU.
- Desktop Lockout: While the bot is running, your phone and computer are fully automated and cannot be used for other tasks. You will need a mouse connected to click “STOP BOT” or close the window when you want to take back control.
- No Dark Screens: Turn off sleep mode on both your computer and your phone. Set both screens to “Never Sleep” / “Never Go Dark” so the automation loop is not interrupted.
6. Important Operational Rules & Science
- How the Computer Vision Works: The bot.py code reads your GPU memory directly. It looks at the specific coordinates you calibrated (like the binoculars or the details page) and verifies if the live color matches your target RGB within a strict tolerance window.
- No Manual Spam Tapping: Do not physically touch your phone screen or spam mouse clicks while the bot is active. Manual touch inputs can desync the serial buffer, interfere with the mechanical relays, or trigger platform anti-bot behaviors.
- Built-in Humanization: To prevent automated detection, the bot automatically randomizes its tap hold durations and cooldown delays within logical human ranges. Only the transition tap to Screen 2 is executed instantly at native silicon speeds.
7. Visual Guide: Desktop Layout During Usage
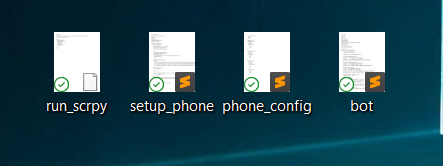
Above: The files you’ll be having on your desktop.
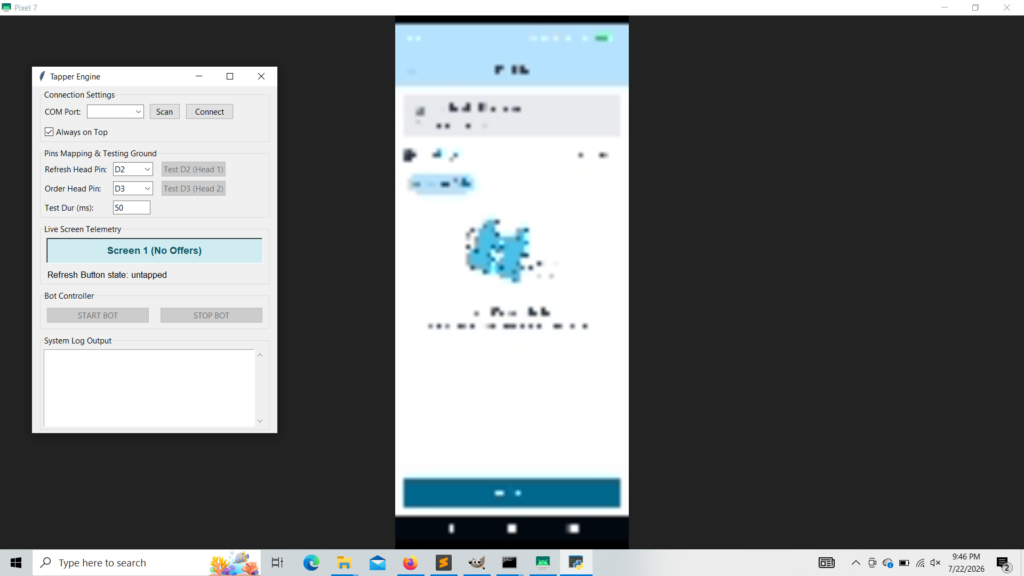
Above: The bot detects Screen 1, the no offers screen.
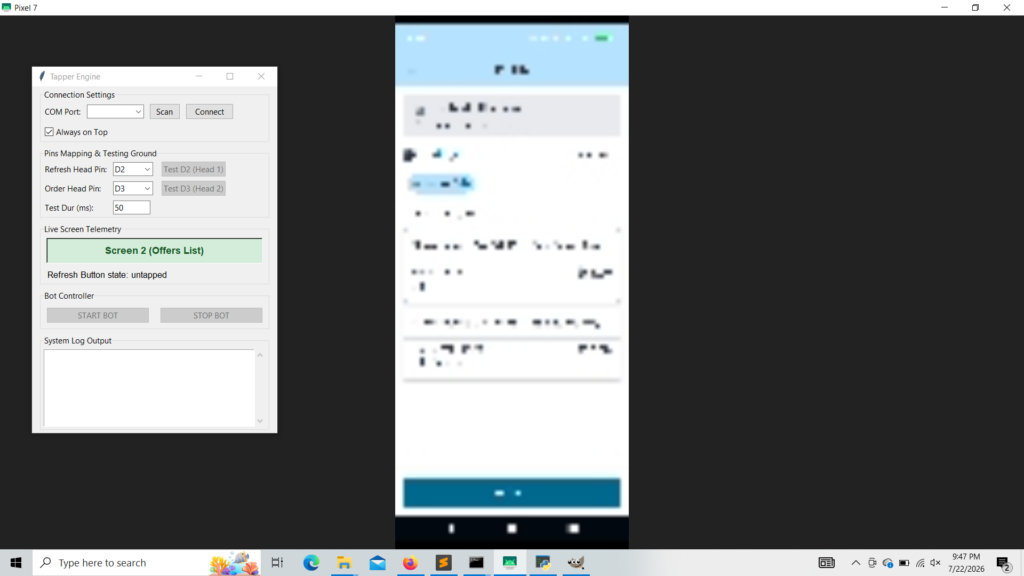
Above: The bot detects screen 2, the offers list screen.
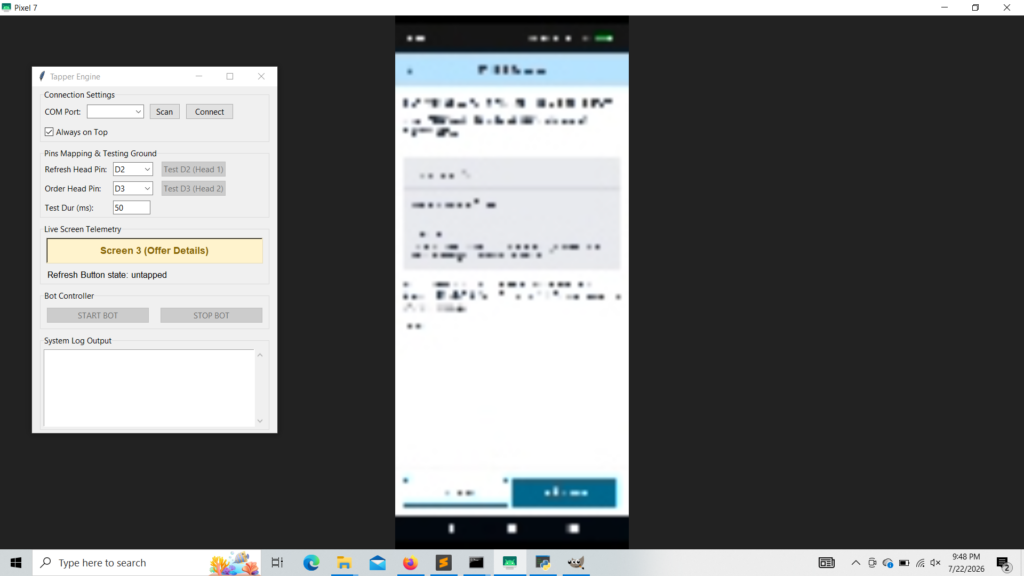
Above: The bot detects Screen 3, the offer details screen.
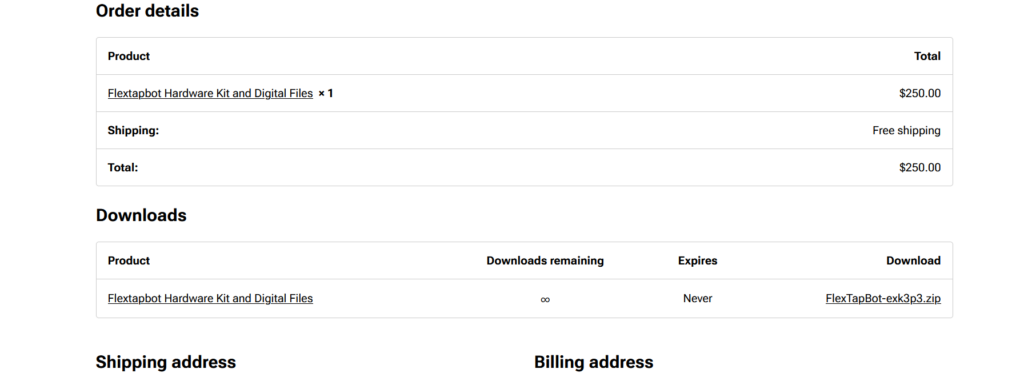
Above: How it looks like after you place an order.